Practical guide
FFAD5033W1 Continuous Drain: Hose Route and Leak Checks
For FFAD5033W1 continuous drainage, attach the garden hose’s female threaded end to the rear connector and route it to a nearby drain with no kinks or elevations. Check the joint seal if there is a small leak. The manual’s 1/2-inch-or-larger hose recommendation does not identify the connector’s thread size or authorize uphill discharge.
On this page
Start with the matching connector and a usable drain
This guide follows the continuous-drainage section of the owner’s guide that Frigidaire links for FFAD5033W1. It covers visible user setup, routing and the small hose-joint leak checks documented there. It does not specify an aftermarket pump installation, adapter engineering or an internal repair.
The manual calls for a garden hose and a nearby drain. Its illustrated connection is on the back of the unit; do not confuse it with bucket removal or assume that optional wiring symbols in the document establish which accessories are installed. Check the actual model, connector, hose and receiving drain before beginning.
Work with the unit off and unplugged as a handling precaution, keep the plug and electrical parts dry, and discard collected water. Do not use condensate as drinking water. If water has reached electrical parts, the unit is damaged or there is a malfunction, stop and obtain appropriate service rather than repeatedly reconnecting it.
Follow the documented hose connection
- Locate the rear drain connector shown in the manual. Unscrew its drain cap; keep the cap for a later return to bucket collection.
- Present the garden hose’s female threaded end to the connector and screw it onto the threaded portion as shown. Confirm that the actual parts fit correctly; do not force an uncertain thread or compensate with a guessed adapter.
- Make sure the connection is secure and does not leak. Inspect the hose and its seal rather than assuming a wet joint proves a compressor fault.
- Direct the hose toward the nearby drain without kinks. Place the end into the drain, keeping the complete route free of elevations as the manual specifies.
- Once the setup is intact and correct, select the desired humidity and fan settings for normal operation. A connected hose does not override the appliance’s settings, bucket fit, operating conditions or fault-code boundaries.
| Item | Documented instruction | Do not infer |
|---|---|---|
| Hose connection | Female threaded garden-hose end on rear threaded connector | A universal adapter or thread specification |
| Hose recommendation | 1/2 inch /12.7 mm or larger drain hose | That the connector itself has a 1/2 inch thread |
| Route | No kinks or elevations; end into nearby drain | Permission to lift water into a raised sink |
| Operation | Choose humidity and fan settings | That the hose creates water when a target or timer has stopped operation |
On a narrow screen, scroll inside the table. Keyboard users can focus the table and use the arrow keys.
Half an inch equals 12.7 mm using 25.4 mm per inch. That conversion explains the manual’s stated hose recommendation; it does not turn a hose size into a connector-thread measurement. If fit is uncertain, obtain the appropriate model-compatible parts information before assembly.
Sources: [1].
Inspect every part of the route
A drain that is lower than the unit does not make every possible hose path acceptable. A loop can rise over an obstacle before falling to the drain. The manual expressly says to avoid kinks or elevations, so inspect the route between both ends, including where it passes furniture, a ledge or a doorway.
The two profiles below are invented examples. Horizontal distance and height are stated in centimeters solely to make the reasoning checkable; neither depicts a measured hose, predicts a flow rate or demonstrates a particular drainage outcome.
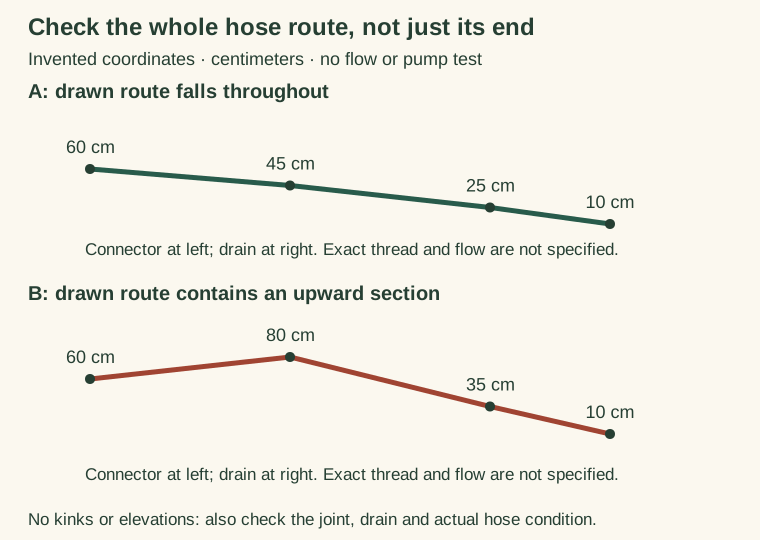
On a phone, scroll within the diagram or open the full-size original diagram. The complete coordinate table below contains the same reasoning.
| Distance along drawn route | A height | B height |
|---|---|---|
| 0 cm | 60 cm | 60 cm |
| 100 cm | 45 cm | 80 cm |
| 200 cm | 25 cm | 35 cm |
| 260 cm | 10 cm | 10 cm |
| Upward segment in the drawing? | None | 0 to 100 cm rises 20 cm |
On a narrow screen, scroll inside the table. Keyboard users can focus the table and use the arrow keys.
A satisfies the drawn no-elevation comparison only. It still does not establish a real drain’s condition, a leak-free gasket, unrestricted hose, compatible connection or successful water removal. For B, reroute to remove the elevated section rather than claiming an end-height comparison or an imaginary pump will solve it.
Sources: [1].
Separate a hose-joint leak from other water problems
The manual’s specific small-leak check is the seal between the hose and drain connector: replace the hose gasket and retighten the hose. This is a visible connection check, not permission to dismantle the appliance. Inspect the actual joint and use a compatible intact hose and seal; a wet floor somewhere else does not identify that joint as the cause.
| Observation | Documented or bounded next step | Stop short of |
|---|---|---|
| Small leak at hose/connector seal | Check seal; replace hose gasket and retighten as directed | Opening the powered housing or forcing uncertain parts |
| Kink or upward loop in hose | Correct the entire route | Declaring a compressor fault from the empty drain |
| No hose on rear connector | Securely screw the drain cap back on | Leaving the rear connection open during bucket collection |
| BUCKET FULL remains on after emptying | Follow bucket seating and float checks in operating guide | Bypassing the float switch |
| Persistent or unidentified leak | Stop and use model support with the actual observation | Repeated operation to locate a leak near electrics |
On a narrow screen, scroll inside the table. Keyboard users can focus the table and use the arrow keys.
The manual does not provide a promised time-to-first-drop or a universal flow test. Record the displayed mode, whether the bucket is correctly fitted, the actual hose route and the precise wet location. Then use the normal-pause and fault-code checks when settings or a stop need explanation.
Sources: [1].
Return to bucket collection without leaving a rear leak path
When a hose is not attached, the manual requires the drain cap to be screwed securely onto the connector to prevent leakage. Turn off for handling, remove the hose without spilling onto electrical parts, and restore that cap. Empty and correctly refit the bucket before normal use; the bucket remains part of the machine’s operating checks.
Do not move a full-bucket unit to a sink. The manual’s removal pictures show handling the bucket separately. If the bucket will not seat or the light persists, follow the documented bucket/float branch and use support for a damaged or unresolved component. The model-care guide keeps warm-water/detergent bucket cleaning separate from clean-water filter washing.
Sources: [1].
Try three route and connection decisions
These are invented paper checks, not device, leak or pump tests.
Case 1
A drawn hose begins at 60 cm, rises to 80 cm over a box, then falls to a 10 cm drain. Is the lower outlet enough to approve the route?
Show answer and explanation for case 1
No. Remove the upward section.
The manual says no elevations. The supplied profile rises 20 cm in its first segment, regardless of the final outlet being lower.
Case 2
An owner reads 1/2 inch in the hose recommendation and orders an adapter marked 1/2 inch without checking the actual connector thread.
Show answer and explanation for case 2
The document does not establish that adapter fit.
The 1/2 inch /12.7 mm statement concerns the recommended drain hose. The manual separately shows a female threaded garden-hose end but does not publish a connector-thread specification here.
Case 3
A unit returns to bucket use after the hose is removed. Its rear drain connector is left uncapped because the bucket is fitted.
Show answer and explanation for case 3
Securely restore the drain cap.
The manual specifically requires the cap when no hose is attached to prevent leakage. A fitted bucket does not cancel that separate rear-connection instruction.
Keep the checks useful without promising a repair
Save the blank drainage record for the model, connector/hose identity, gasket, whole route, receiving drain, wet location, cap status and any remaining code. Nothing is submitted. A completed worksheet records observations; it does not certify the installation or the internal machine.
Sources and further reading
- Frigidaire complete owner’s guide 16120100A15993, July 2019Official FFAD5033W1 support page-linked guide. Physical pages 3, 4, 8, 9, 10 fully read; source panels/bucket/drain drawings actually viewed. Manual date is 2019, not a 2026 revision.
- Frigidaire FFAD5033W1 official product supportExact model and Complete Owner’s Guide link observed on 2026-11-13. It establishes the document association; no measured performance, product ranking or repair case.