Practical guide
Why Do Clothes Smell After Washing? A Troubleshooting Chart
Start with when the smell appears and whether it affects one garment, the whole load or the washer itself. Then check a compatible wash, prompt removal, complete drying and storage. An onset chart and recheck record help you choose a useful next step without stacking cleaners.
Start with the timing, then choose a branch
Clothes that smell straight out of the washer present a different question from clothes that smell only after a damp overnight wait or several days in a cupboard. The timing does not identify a microbe or prove that the washer is faulty. It tells you where to begin checking the process.
Notice the odor during ordinary handling. Do not put your face inside the washer, a drain or a chemical container to investigate it. For a burning smell, suspected gas, irritating fumes, breathing symptoms or an electrical problem, stop routine laundry troubleshooting and seek the appropriate emergency, poison or appliance help. A smell is not a reliable safety test; some hazardous gases have no odor.
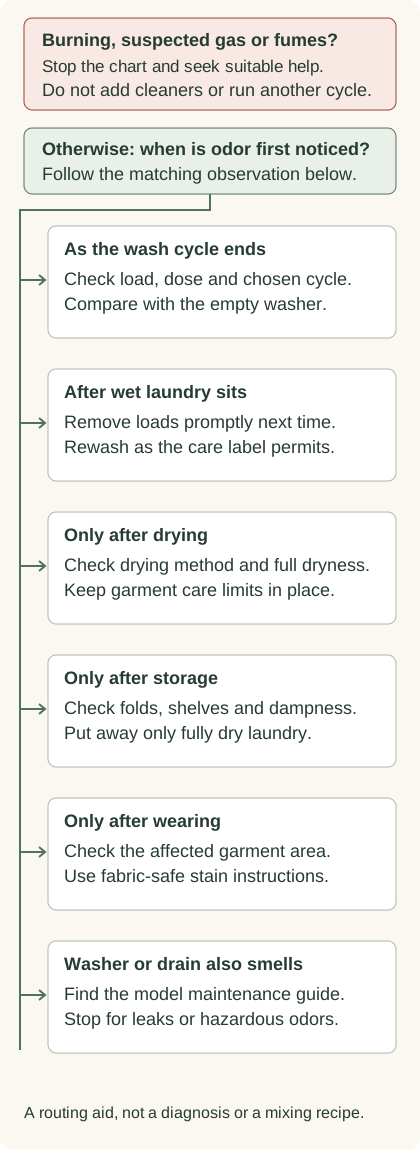
Six observations and the next useful check
| Observation | Check first | What the observation cannot prove |
|---|---|---|
| At the end of washing | Care-label settings, detergent dose, load movement and whether the empty washer also smells. | That every odor means mold or that more detergent will solve it. |
| After wet laundry sits | The delay before removal and whether the next compatible wash can be unloaded promptly. | A universal safe number of hours for every fabric and room. |
| Only after drying | The permitted drying method, thick seams, pockets and accessible dryer maintenance. | That the original wash was successful merely because wet fabric seemed acceptable. |
| Only after storage | Complete dryness before folding and dampness or odor in the storage location. | That a laundry additive will fix a damp cupboard. |
| Only after wearing | The garment area affected, its soil and its permitted pretreatment. | That the whole washer needs disinfecting. |
| Washer or drain also smells | The model’s maintenance and installation instructions; visible leaks and drainage symptoms. | The right hose depth, cleaner or cycle for a different model. |
Check the wash baseline before buying an odor remover
Read the garment label, detergent label and washer manual together. Each answers a different question: what the item tolerates, how the product is used, and how the machine handles the load. A setting suitable for cotton towels may be unsuitable for a wool sweater, decorated shirt or stretch garment.
The American Cleaning Institute’s laundry basics emphasizes sorting by care requirements and soil, using the proper detergent amount and leaving room for clothes to move. Both too much and too little detergent can give poorer cleaning results. Measure the dose for the actual product and load; a capful of one concentrated liquid is not interchangeable with a capful of another.
If the machine requires high-efficiency detergent, use a suitable HE product as its instructions require. Check automatic-dosing settings too: the machine’s estimate may depend on concentration and load. Do not add a manual dose on top of an automatic one without checking the manual.
Match the cycle to the item and soil. A quick cycle intended for a small, lightly soiled load is not automatically a substitute for an appropriate regular wash. Avoid solving that mismatch by guessing at hotter water or extra chemicals. For a first recheck, correct one clear departure from the relevant instructions.
Branch 1: clothes smell as soon as the cycle finishes
Note whether the problem affects the whole load or one shirt, and whether you already noticed an odor in the empty machine. If several different items share the problem, review the common wash conditions before treating each garment separately. If one underarm area is affected, a garment-specific soil or stain check may be more useful.
Review how crowded the load was and whether the detergent was measured. The ACI laundering problem guide identifies overloading and insufficient detergent among causes of poor soil removal; its residue discussion also shows why fabric feel and visible residue deserve attention. These are possible checks, not a diagnosis based on smell alone.
Choose a comparable, label-compatible wash and fix the specific loading or dosing problem you found. Keep a record of other changes. A smaller load and a different cycle changed together might help, but you cannot tell from that result which change mattered. There is no need to repeat a damaging setting just to make a comparison scientifically tidy.
Branch 2: odor appears after wet laundry has been left sitting
Samsung’s washer-odor guidance names leaving wet clothes in the machine as a source of moisture and odor affecting laundry. Its practical prevention advice includes removing the load promptly. Plan the next wash for a time when someone can actually unload it.
If the delayed load now smells, rewash washable items according to their labels and then dry them properly. Do not simply perfume the load and fold it damp. The observation does not justify a fixed rule such as “every load is fine for eight hours” or “every delay requires bleach.” Conditions and garment instructions differ.
A useful recheck is the same type of load removed without the previous delay, using a permitted wash and dry process. Record whether the odor is present at cycle completion and again when fully dry. Improvement supports changing the removal habit; it does not identify the organism or chemistry involved.
Branch 3: the smell becomes noticeable during or after drying
Separate ordinary stale laundry odor from a burning smell or irritating fumes. The latter belongs outside this chart. For routine odor, compare the wet item with the fully dried item, and note the drying method. A wet smell check cannot settle how the finished garment will smell.
Check thick waistbands, pockets, towel edges and folded layers before storage. On a rack, arrange items so air can reach them and use the drying position allowed by the label, including flat or shaded drying when required. Do not turn a “do not tumble dry” instruction into a hot-dryer experiment.
For a dryer, follow its instructions for the lint screen, load and cycle. ACI’s basics recommends regularly clearing the lint trap. Persistent drying problems, unusual heat or appliance odors require manufacturer guidance, rather than repeated hotter cycles or improvised work on internal parts.
If a visible stain also remains, check it before machine drying: ACI warns that drying can set stains. Odor and a visible stain are related observations but need not have the same cause. Use a permitted air-dry check where appropriate, and do not promise that one extra rinse or stronger dryer setting will resolve both.
Branch 4: laundry smells only after being put away
Check whether the items were fully dry before folding. ACI explicitly says to fold and store clothes only when fully dry. An outer surface that feels dry does not answer whether a thick folded area is still damp.
Look at the place where the odor appears: a cupboard shelf, closed bag, laundry basket or tightly packed drawer. Note any dampness or pre-existing odor there. If laundry is acceptable when dry but develops an odor in one location, washing additives do not address that location’s moisture or contamination.
For a cautious comparison, put a fully dry item in a clean, dry alternative location and record the result. This is an observation, not a mold test. Persistent dampness, leaks or visible growth in the room calls for the appropriate building or remediation advice. Avoid transferring a suspected storage problem back into the washer as a reason to mix cleaning products.
Branch 5: a particular garment smells again after wearing
Mark the area involved rather than assuming the entire load failed. An underarm mark, collar soil and an all-over smell are different observations. Check the item’s fabric, trim and product instructions before pretreating it.
The ACI stain guide gives specific approaches for deodorant marks and perspiration stains. Those are stain-treatment instructions, not proof that an odor is caused by a particular bacterium. For example, liquid-detergent pretreatment is listed for light deodorant stains; a suitable prewash product may be a different option for heavier staining.
Follow the permitted product method, including a hidden-area colorfastness check when needed. Do not apply a cotton-shirt recipe to wool, silk, stretch fabric or dry-clean-only clothing. See the deodorant-stain guide for the mark itself and the colorfastness guide for reading test instructions. If the label blocks treatment or the garment deteriorates, stop and consult its maker or a cleaner.
Branch 6: the empty washer or nearby drain also smells
Find the exact model’s use and installation instructions. Note the ordinary location of the problem: door seal, drawer, drum or nearby drain. Only inspect and clean accessible areas the manual permits. Do not dismantle electrical parts or open a filter simply because a general article mentions one.
Samsung’s support page discusses detergent buildup, wet-load delays, model-dependent filters and drain installation. It also distinguishes routine self-clean maintenance from a procedure for mildew smell or visible mold. That distinction matters: a cleaner, dispenser or cycle described for one procedure is not a universal instruction for every washer.
Run an approved maintenance procedure with the tub empty when the manual requires it, using only the specified product approach. Do not borrow a hose-depth number or bleach quantity from a different machine. Record what you used before another procedure is considered, and follow the manual and product instructions for any required rinsing.
Dry accessible areas and permit door or drawer airflow only when consistent with the manual and safe for your household. An open appliance must not become an access hazard for children or pets. Leaks, drainage failure, persistent odor after permitted maintenance or uncertain installation are reasons to contact the manufacturer or a qualified professional.
More scent or more chemicals can hide the useful clue
Adding fragrance may change what you notice without correcting the loading, drying or storage problem. Buying an odor product before locating the stage can also make your next result harder to interpret.
Use one labeled approach at a time. Poison Control’s unknown-fumes guidance explains that chlorine bleach mixed with ammonia or acids can produce hazardous gases. Do not combine bleach, vinegar, ammonia or washer cleaners into an improvised recipe. “Natural” does not establish chemical compatibility.
Cleaning and disinfection are different goals. An ordinary odor does not establish a need to disinfect, and an oxygen-bleach or “bleach alternative” product is not automatically a disinfectant. ACI’s bleach guidance explains the distinction and keeps garment, product and machine instructions central. This chart does not cover healthcare laundry, hazardous contamination or specialized infection-control requirements.
Use the recheck record to make the next wash informative
Download the laundry odor recheck record. It has space for the first stage, garment instructions, washer model, dose, load, removal delay, drying, storage and a follow-up result. You do not need a perfect experiment. Record the differences that could affect what happened.
Example: delayed towels. Towels seemed ordinary at cycle completion but were left wet until the next morning. The next label-compatible load is unloaded promptly and dried fully. If it remains acceptable after storage, prompt removal is a useful habit to retain; the comparison has not proved a microbial diagnosis.
Example: one shirt. Other items are acceptable, but one shirt’s underarm area smells after wearing. Check that garment’s permitted soil treatment before scheduling repeated washer cleaning. If its fabric or finish prohibits the proposed product, choose maker or professional advice.
Example: storage location. Fully dried laundry smells acceptable, then changes in a damp cupboard. Compare a clean, dry storage location and address the dampness. Extra scent in the wash is unlikely to tell you whether the cupboard problem was corrected.
If compatible changes fail, bring the record, product names and model details to the relevant manufacturer or cleaner. A bounded description such as “odor first appears after storage in this drawer” gives them more to work with than “nothing gets my clothes clean.”
Sources and further reading
- American Cleaning Institute: Laundry BasicsSorting, detergent amounts, appropriate cycles, load movement, dryer lint care and storing only fully dry laundry.
- American Cleaning Institute: Laundering Problems & SolutionsPossible causes of poor soil removal and residue. Garment and product instructions control temperature and treatment.
- Samsung U.S. Support: Washing machine or laundry smells badManufacturer example covering detergent buildup, wet-load delays, accessible maintenance and installation. Use the exact model manual for procedures and dimensions.
- American Cleaning Institute: Stain Removal GuideSeparate instructions for deodorant marks and perspiration stains, plus care-label and pre-drying checks.
- American Cleaning Institute: How to Use BleachGarment and cleaner limits, laundry versus disinfection claims, and warnings against incompatible mixtures.
- Poison Control: Identifying unknown fumes in your homeHazardous mixtures, irritation and breathing symptoms, and the limits of odor as a safety signal.